WinSignHelper is a GUI for osslsigncode. WinSignHelper makes it very easy to code sign Windows .exe and .dll files under Mac OS X with osslsigncode. A version of osslsigncode has to be installed. See instructions below how to install osslsigncode.
WinSignHelper was created to help Livecode developers to easily code sign their Windows standalones without the need of a Windows computer or virtual machine. Of course WinSignHelper can also be used with any standalone, not only with Livecode created ones.
How do i use WinSignHelper
Just drag a folder which contains your windows program files into the window of WinSignHelper. WinSignHelper will immediately start. If you’ve selected to make a backup copy of your folder first then WinSignHelper creates a backup and starts then to sign the files in the original folder. The user will be informed about the result of the signing.
How do i install osslsigncode?
The easiest way to install osslsigncode is to use HomeBrew.
If Homebrew is not installed then you have to first install Homebrew. If Homebrew is already installed on your system then jump directly to step 3.
open Terminal
in Terminal run the following command and wait for the command to finish
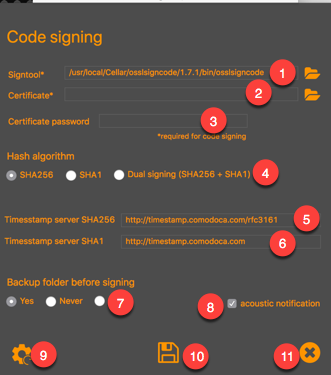
There are some settings you have to set in WinSignHelper before you can use it.
The following settings are available
The path to the osslsigncode executable. (required) default: /usr/local/Cellar/osslsigncode/1.7.1/bin/osslsigncode At the time of writing the current version of osslsigncode was 1.7.1. When changing the path to osslsigncode the answer dialog opens with the folder /usr/local/bin. If osslsigncode was correctly installed then you should find a link file osslsigncode in the file list which you should select. Selecting that should put the correct path to the executable osslsigncode.
The path to the p12/pfx certificate (required)
Password of the certificate. (optional) If not set, then the user has to enter the password when the signing process starts
Hash algorithm, default: SHA256 Select between SHA256, SHA1 and Dual signing SHA1 + SHA256. Dual signing might be useful if you want to sign your files older Windows version like Windows XP.
The URL of the timestamp server for SHA256 default: http://timestamp.comodoca.com/rfc3161
The URL of the timestamp server for SHA1 default: http://timestamp.comodoca.com
Select if you want to make a backup copy of the folder before signing. A not successful sign process might result in a defective or deleted file. So making a backup before signing might be a good idea. default: Yes
Select if you want WinSignHelper to play a notification sound when the signing process has successfully finished or when an error occured. default is "checked"
The 3 buttons have the following functions:
Reset to default values
Save the current settings permanently to disk.
Close preferences
Some really important notes:
The Windows files need to have read and write permissions. Otherwise signing is not possible. The created Livecode standalone (.exe) has the correct permissions, but not the externals (.dll). They are write protected. Therefore WinSignHelper needs to change the file permission for each file before it is signed. WinSignHelper uses the shell command chmod. The permissions are set to 666 which is equivalent to -rw-rw-rw-.
An unsuccessful signing of a file will delete the file. So better make a backup of the folder either manually or let WinSignHelper do a backup for you automatically before signing.